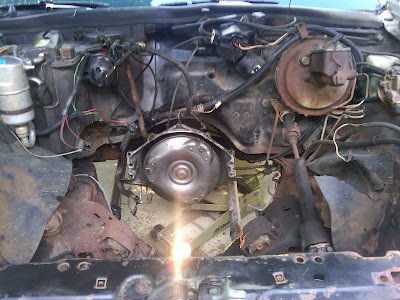
Thought a B-body build thread

beertestr

Club Member
Thought a B-body build thread would be interesting

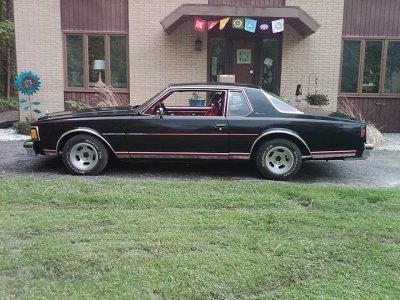
Picked up a 79 Caprice 2-door a few months back. 67,800 original miles, original 305, replacement Summit TH350... and prepped for donking..
3k63m83pa5Y25P55R2b525f630369b65f114d.jpg


De donked it with some 96 Impala SS front springs, and some 9C1 (aka po-lice car) springs in the back.

IMG00027-20110518-1819.jpg


Ahhh... much better. More pics later..
 
Last edited:
Good job saving it from a life of ghetto fabulousness! ;)

Kinda reminds me of the old 77 Olds Delta 88 2 door i used to have. :thumbsup:
 
Oh come on some 26's would have looked hella fly fabulous playa. Hahah, what are your plans for her.
 
More info and pics. Stance is much better now, but the 235/60-15's leave lots of room for more rubber. I always wanted Cragar S/S's, but now that I have them, I am not sure.
IMG00026-20110518-1818.jpg

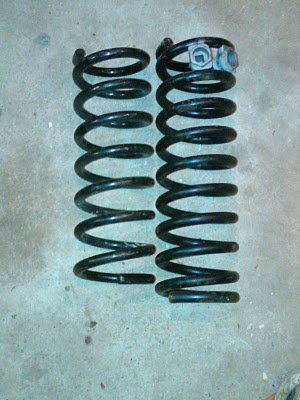
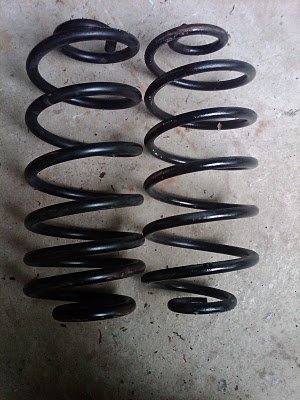
Oh, and front and rear springs side by side. Stock vs. Donk.
IMG00351-20110514-2058.jpgfrontsIMG00371-20110518-1706.jpgrears. The fronts had 4 spring wedges per side, the rears had lift-thingies.. can't remember what they are called, but they are classic JC Whitney hacks for sagging springs.
Also picked up a set of American Racing Ansen Sprints, aka "slot mags" from http://www.motownmuscle.com/forums/member.php?1733-URDONE4URDONE4 here on the forum. I only test fit them and ran them about 5 miles to diagnose a vibration issue. Tires are pretty dry rotted, but the wheels are totally restorable. I did some research on how to restore them right, just need some time to do it.
IMG00372-20110520-1641.jpg


Oh yeah.... Burgundy (Brandywine???) Interior. I was so ready to get black interior parts, but the red is starting to grow on me.
3mb3p53o05Q05U65R5b5264b0c9623bb01f96.jpg
 

Attachments

  • IMG00372-20110520-1641.jpg
    IMG00372-20110520-1641.jpg
    117.9 KB · Views: 222
Mods:

Nothing crazy so far. I had to work on my DD and my bike to keep them running (truck), and looking pretty (Bike), so I have only been hmm'ing and haw'ing.

To solve a driveline/bent axle shaft issue, I swapped out the original 7.5" axle with a 2.41 axle ratio for a 3.08 8.5" 10-bolt out of one of my old cop cars. For the record, I've had about 9 different B-bodies, from 9c1 police cars, 94 Police Wagon (1A2), 95 Impala SS, another 77 Impala 2-door, and an 89 Caprice... so I have a few ideas of what to do with the car.

This is what 80 mph looks like when you have the wrong speedo gear in after an axle ratio swap... bish was BURIED :) Luckily I found a free GPS app for my phone to track vehicle speed.

IMG00429-20110612-1712.jpg


Other than that, I am trying to decide on the next engine. The 305 is not cutting it. I WANT it to be enough for me for the summer, but I am looking HARD at my 383 Shortblock, and wanting to will it back together...
 
Nice car! I think you should have done it donk style. Just kidding.

I do dig the porno red interior though, kinda cool.

The car needs an LS engine.
 
Let's see if I can transfer a years worth of updates from another forum to here. Just realized I had not updated anything on this board for roughly 363 days..

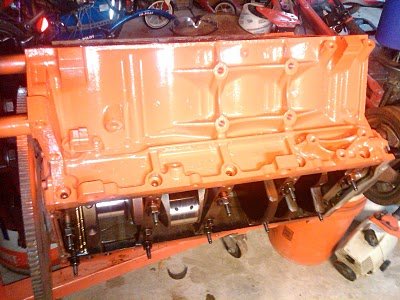
As of the last post, there was a Chevy orange painted LS block and an intake. The shortblock is a something I got from a MM member.... who got it from me in long block with transmission form. He took the parts he wanted, and when the shortblock came back up for sale, I jumped on it. It's a 2003 LQ4 block. Out came the rods and pistons (little cruddy), and in went some LS2 rods and pistons. Flat tops with full floating rods. They weigh the same as the LQ4 units that came out, so it was a bolt in swap. I also added SPS rod bolts and fresh rod bearings while it was apart. The crank was in awesome shape, bores were very good too. A minor dark spot or two, but the bores measured out fine. Slapped on a F-body oilpan, designed my own mount brackets (not adapters), bolted on some CNC ported LS2 heads with a little 222/228 (ish) 0.570/570 ish lift Comp cam, added the Edelbrock carb intake/ignition kit and a truck accessory drive with mech fan...

Purdy crank...

IMG00462-20110714-1555.jpg


IMG00559-20110822-1930.jpg


For last year I kept the Th350 in, but dropped in a B&M 2400 stall converter. "upgraded" the axle from a 2.41 gear 7.5" 10 bolt to a 3.08 open diff 8.5" out of a 94-96 Caprice cop car. I reused the 9" drum backing plates but needed 91-96 drums to fit the axle shafts. I had Dave Jarvis re-drill the stock axles to 5x4.75 (91-96 Caprices are all 5x5), drilled the drums, and slapped it under the car with new lower control arms.

I adapted a cat-back system for a 94-96 Impala, it was an ATR Pitbull system. Nice 2.5" system made out of 304 stainless, but boomy as hell.

Some pics from the day I got is all running on the new motor, which also happened to be the Dream Cruise Saturday.

The trans didn't like the new level of power, I guess when Summit said their Street/Strip TH350 was good for 450 HP, and I guess they meant it. It shifted OK 1-2, but the 2-3 at WOT was pretty sloppy... so I didn't do it.

Pics at the WDC, the MISSL (Michigan Impala SS Legends) car club hosted a national Impala SS event last year, and we rented the triangle of land at the south side of the Widetrack loop in POntiac for the event.
Here's a shot of the car there, next to my old cop car that was spruced up cosmetically since I owned it.

IMG00549-20110820-1610.jpg


My custom guage pod..
IMG00547-20110820-1446.jpg


Which an hour or two earlier was a teflon coated baking pan..

IMG00546-20110820-1001.jpg


More on the next post...
 
Took it for it's last 135HP ride on Sat..

Let's let the kitty out of the bag.

3:00 PM Sat
IMG00004-20110730-1428.jpg

6:15 PM Sat

IMG00006-20110730-1814.jpg

7:30 PM
IMG00009-20110730-1932.jpg

IMG00012-20110730-2019.jpg


9:30 PM after dinner and test fitting 3 sets of exhaust manifolds.
IMG00020-20110730-2120.jpg


This was only mockup. Needed to final weld the motor mount brackets I made (I love my plasma cutter!!), do a light notch in the x-member for the oilpan, and a little on the RH frame to fit the manifolds I want to run. Stock 2004 Silverado fan fits the stock fan shroud, as does a thicker core 1988-1995 Chevy Silverado V8 radiator. Rad cap clears the underside of the hood by 5/8" as does the air cleaner, though I need to cut the insulation out to fit a taller air cleaner if I can get it to fit. Also, the 79 has the brake prop valve on the frame right where the manifold-downpipe flange fits.. this might be the time to put the 91-96 master and prop valve in.
 
After the Dream Cruise, I didn't do much on the car besides work out a few bugs and drive it.

Last November I took it to Milan for it's first run. Here's a paste of my post from the SS forum.


The word of the day is traction... I ain't got nun...

Made 3 passes.

Before I say anything... let's just say that Kelly Charger 235/60 15's are not the epitome of traction. Worn-to-hell posi's don't help..
Other key notes:
1) Aforementioned dead posi and 235/60-15's.
2) 3.08 Axle ratio
3) No real carb tuning


Run 1) Ran the car as noted above, left the base spark pill in the MSD box that comes with the LS1 intake. I drove around the burnout box and did a quick tire clean. Flatfooted it after a sleepy 1.0051 RT...
60' -2.29
1/8 - [email protected]
1/4 - [email protected] Seems I have a traction problem..Car spun a little off the line, then a lot at 4000, then a LOT on the 1-2. Ran through the traps at 6800 or so in 2nd.. sweet, no need to slip and slide into 3rd..

Run #2
Put in the #3 timing pill. Should bring in the timing at a little lower RPM.
Loaded up the converter a bit and we Spun spun spun.....
RT-0.8021.. a little less sleepy
60' -2.849
smile.gif

1/8 - [email protected]
1/4 - [email protected]

That run pissed me off, so I lined right back up..
RT - 0.5619 going in the right direction at least..
60' - 2.29
1/8 [email protected]
[email protected]

Weight is just over 4050 with driver..
EDIT Scratch that, it's closer to 4160... my math not so good.


That's is for this year. Picked up a trans today, frame swap, EFI, more gear with a posi, and a few other things over the winter..
 
December 2011 update

A friend of mine and I transported the "new" frame from one barn up to another MISSL members shop. Frame is oh-so purdy. It came from an AZ state police 94 9c1 that had the body scrapped out here in MI. Previous owner lost his desire to finish putting the car back together, and I convinced him to cut the body up for rust repair pieces. He did quite well with that approach, and I got just the rolling chassis, perfect. I think I am going to build up the axle off this frame, it has barely a rust pit on it.

IMG00806-20111210-1716.jpg


Other stuff:
I should be picking up my trans controller from FedEx Office later today. It's a PCM-2000 unit, that'll run a 4L60E, 4L80E and about 16 other transmissions (if I go hog wild). It will also work with an E38 controller if/when I go that route.

I am looking through header options right now. If I get home during daylight hours, I plan to look at what key points I need to look for. Hopefully I'll find a bolt in solution.

I am in the finishing stages of ordering parts for my axle. Plan is 3.73 gears, 400# Eaton Posi, Moser Alloy axles with c-clips, and either converted 9c1 discs, or Corvette discs in the back. I want to be able to retain 15" wheel capability, so I will be looking for NASCAR solutions for brake upgrades ultimately.
 
Christmas 2011 Holiday Progress

Over the holiday break, I was able to get the frame into a friends shop and start boxing the frame. Got the right side done.

2011-12-28_16-40-12_216.jpg


2011-12-28_16-40-29_129.jpg


I decided to go 4L60E for next summer. While I want to assemble the 402, the funds are not really there, so the iron 6.0L will stay, but with the EFI/60E upgrade. I got a Stage 3 trans that was built for another MISSL member by Shane, so it should be up to the task of handling the ~475 HP I'm making now.

Perhaps the even more Herculean task was getting my shop and garage organized enough to be able to fit the frame inside at my place. I need to add a few overhead lights, but here it is all snug as a bug...

I had to stuff the motorcycles into the shop, and get rid of a couple of engines, but I am making progress.

2011-12-29_15-53-40_168.jpg


Left side frame mods done.

Extension for crossmember - Caprices have a goofy doglegged trans crossmember, I think this is a leftover design from when there was only one catalytic converter under the passenger floor board, so the right side leg is further rearward than the left leg of the x-member. I had a feeling that the left side of even the 94-96 crossmember (which has clearance for dual exhaust) would be a problem with the headers so I made this little frame extension
2012-01-28_22-31-57_520.jpg

2012-01-28_22-32-07_797.jpg


Tacked in.
2012-01-28_22-33-44_81.jpg


Boxing Plate - I made a better template to cut rounder holes with my plasma. It took longer to drill the template on the drill press than plasma cut all 5 holes... I freakin love plasma...
2012-01-29_01-55-10_510.jpg
 
Axle Build
8.6" 4.10/400# Eaton and Moser axles are all installed. I want to change the brake lines around, paint the housing, and weld on some tabs on LCA brackets for IC adjustment.
Nailed the pattern on the second pinion adjustment... I'm pretty proud of that. . Backlash is good too..
2012-02-05_14-06-48_693.jpg
2012-02-05_14-06-52_425.jpg


Purdy diff....
2012-02-05_14-02-56_747.jpg


Note... If you don't have this tool, or some home-brew version of it.
2012-02-05_15-55-48_346.jpg


Don't bother messing with your UCA bushings in the diff. I had both out and replaced in less than 15 minutes... so much better than the last time I did bushings 8-10 years ago..

I still want to re-route the brake lines to two individual brake lines off the frame. Those of you with TBSS's know what I am thinking. This lets you pull the axle by just unbolting the axle. No need to crack the brake system, or unhook the hard lines from the axle.


On to other things.

Test fitting headers. Here's some pics of the Pacesetter Trailblazer SS headers. Overall not bad. I am still comtemplating setting the motor back another 1/2". If I do that, the fit will be much better, might not need to clearance anything..

Right side.
2012-02-01_20-29-21_87.jpg


A little tight to the crossmember brace, but I think I can trim it back without removing it completely.

2012-02-01_20-29-41_557.jpg
 
Frame notch

Frame notch pics

I mocked up the intended tire, and then provided 2" clearance front and rear on the frame for tire growth, and the option to go to a 29-30" tire.. I don't anticipate it, but measure twice, cut once. I didn't see any dramatic change to the rail section by reducing clearance.

Stock rail with 28x10.5 ET Drags on stock 15x7 wheels. No idea if this will fit the 79 wheel well yet. I might need to go inboard, maybe not. IF anything, notching now gives me room for a 12.5" wide slick, or 315/35-17's later. I also picked up a set of 28x11.5 ET Streets. I swear they are narrower than the 10.5" ET Drags.

2012-02-11_21-29-00_486.jpg


About 7/8" from the sidewall bulge to the stock frame.
2012-02-11_21-30-32_712.jpg


3 hours later..

2012-02-12_18-23-18_24.jpg


Rail get's pretty thin at the bottom front.. need to think of some reinforcements inboard of the rail.

2012-02-12_18-24-14_704.jpg


Other items. I tacked a temporary brace to the rear section of the frame. It's flimsy with a full section, opening up the boxed section would probably have messed up the frame mounting points and put a twist in the whole rear end.

I plasma cut the frame to make the notch, but on the left side, I might switch to a 4.5" cutoff wheel. That, or I need to come up with a better cutting guide to keep the cut straight. To get the straight planar cut front to rear, you sometimes are cutting through 1 thickness of the frame, sometimes right at the seam between the inner and outer clamshell, and sometimes through bolt thicknesses. Trying to keep a straight cut with plasma (where there is not effort/resistance for the torch not to wander) is not an easy task. We'll see. I have an hour or so tonight to mess with it.

Right side frame rail notched and boxed. Time to figure out how to add section back into the rail.

Here's what the inside of the rail looks like at the kickup.. bottom gets pretty thin.

2012-02-16_11-28-32_78.jpg


So, I was going to widen the frame on the inboard side, but the control arm gets close, like about 1/2" to the frame. Any sway in the rear suspension, and you'll hit the frame if I cheat this area in any more.

2012-02-16_11-30-59_712.jpg


I think I am going to add material anyway, and modify the control arm. The main section is about 1.5" wide, same as most of the aftermarket arms, but the lower lip adds about 1/2" per side. I might box the LCA, and then cut the lip off the outboard side. This will pick up. additional room to add frame section.

The next issue is to try and add section near the rear spring. If there was ever a reason to run a stock car 5" spring instead of the big ass 7" spring.. this is it. I might go shopping for some hypercoils.

Hmmm... it would be cool to put some NASCAR jacking plates in there as well... HMMMM..

This is as far as I got with the frame notch before it was time to put the body on the new frame. All of the welding/fab work that needed to be done with the body off was completed, everything else could get done with the body on.. Next post - body swap.
 
Frame swap

Here's some pics of what I did to add some beef to the narrow area of the frame.

First I got some card stock to make some templates..

2012-02-18_00-39-10_67.jpg


Template cut

2012-02-18_00-47-06_427.jpg


Left side frame rail looking rearward - before and after
2012-02-18_02-06-21_544.jpg
2012-02-18_17-40-25_67.jpg


As noted earlier, I will need to modify the control arms a bit to pick up some clearance.

With the help of two MISSL members, we hauled the frame up to another friends shop and we got to doing the body swap.

One of the last pics with before it all comes apart...
2012-02-18_15-34-29_971.jpg


An hour or 3 later and only two stuck body bolts.
2012-02-18_16-54-30_613.jpg

2012-02-18_16-54-40_7.jpg


Hovercraft mod in progress
2012-02-18_16-56-13_165.jpg


Last pic before we drop the body back on..
2012-02-18_17-39-58_597.jpg


Several hours later, body is on the frame and bolted down with only a few bolts, I need more bolts, and to repair the two busted bolts trapped in the body.
 
Motor test-fit

Front brake lines are all bent and fitted up. On a whim last summer, I picked up an ISO bubble flare kit, thinking that I'd need something like that someday. That day was Friday and Sat. I needed a bubble flare to the prop valve, and for the hard-line to brake hose junction. I put the 3/16" tee next to the LH control arm, and plumbed from there.

I test fit the engine with an additional 1/4"-5/16" setback. F-body oilpan fits with about 1/4" to spare on the RH corner of the pan. I pulled the engine back out, and hammer formed the engine crossmember a bit more to get over 1/2" clearance.

Here's a pic of the unmodified clearance. You can see how the crossmember sweeps rearward in car dramatically. Doing a little work in this area is all that's needed to fit the F-body pan.
2012-02-25_17-12-07_449.jpg


Left side is much better, no modification needed. The engine crossmember sweeps further rearward on the RH side than the LH side. This may be due to the offset RH mount, though there is plenty of room to move the mounts back on frame as well on both sides. I might look into this in the future to see if I can get an AC compressor to fit on the RH in the stock LS compressor location. Certainly, the truck accessories offer the best possibility for this, as the belt path is 40mm forward of the Corvette accessories.

Left side
2012-02-25_17-12-22_881.jpg


I also test fit the truck intake, in this case it's an LS2 truck intake.
Plenty of room to the firewall, hood clearance looks really good too.
2012-02-26_11-02-49_422.jpg


The last place I was concerned about with the extra engine setback was getting the transmission-engine bolts out, and room for a trans dipstick. Looking at the back of the engine, the bolt that's in the ~10 O'clock position looked tight to the flange between the toeboard and the firewall. I was able to get this bolt out and back in no problem, though using a torque wrench on them is not going to be possible.. :D

2012-02-25_17-13-39_93.jpg


I test fit my SSR driveshaft to see how much it needed to be shortened, it's all marked up, looks like it needs to be about [EDIT] 1.875" shorter. I am taking the shaft over to Dynotech after work today.
 
Rear frame work is done, I finished up the last pieces needed to get back some section width just in front of the tire. All boxed in now and welded up... painted after the pic..

2012-04-15_19-05-02_143.jpg


rear LCA's modified to fit.
LCA's were boxed, and then I cut the "lip" off the outboard side to pick up clearance. Pic is a little blurry, but you can see the left side is missing the lip at the bottom of the control arm. Right after I put down the first two welds, I ran out of shielding gas on my TIG, lukily the MIG had a pretty full tank..
2012-04-15_19-06-31_752.jpg


All in all, about 4 hours work on Sunday and last night. Tonight, I plan to get the wheel bolts out, the wheel studs and jam nuts into the rear axle, and start hanging the brakes and shocks. So, rear axle cover is coming off to pull the axle shafts out 2", and then put them right back in. Luckily, the new stids and jam nuts are on the shelf already, which is good because I still don't know if I am going to be running my ET Streets on wheels with a 5x5" bolt pattern or a 5x4.75...


Rear brake rotor calipers and pads are on the car. I started to mockup the rubber hose routing for my back brakes. I want to eliminate the center hose and run a rubber hose off each side of the frame. This should allow me to remove the axle without cracking the brake hydraulics open, just unbolt the calipers from the backing plates and away we go.

I changed out the 3" long Moser lug bolts with screw in studs. This way I can convert from 5x4.75" to 5x5" with relative ease. The bolts were too long to be able to thread out the back of the axle flange.

I also drilled the rotors for 5 x 4.75" bolt pattern so I should now have full flexibility to either bolt pattern on the back. Still working through options to allow this on the front. The best one is to use 1LE Camaro rotors and Caprice rotors as needed, but I'd still like to see if I can drill the front rotors for both patterns. It does not look likely as any off the shelf replacement rotor for a Caprice (or Camaro) will have pressed in wheel studs, and those holes are larger than the tap thread I would need for a 1/2" stud (what I have in the back).

Back rotors.

2012-04-20_21-53-57_780.jpg


Other stuff. I started to dink around with making a new trans crossmember, but then realized I needed to mockup the exhaust. That snowballed into wanting more clearance between the ride side primaries and the frame. I ended up pulling the header and putting pie cuts in the primary near the head flange, and tweaking pulling in the primaries a bit. Worked out really well, but I killed a coupler on my TIG cooling unit in the process.. DOH.. parts on order. Pics of the header later.

Before I get back to working on the x-member or exhaust, I am going to finish installing my SSR driveshaft to make sure I don't put bits where the driveshaft wants to be. Time to change out the slip yoke to the shorter B-car slip yoke.. though I am tempted to just cut the slip yoke on there down and run it. Less hassle with pressing out the nylon pinned -joints and changing them out.

I also had to prep my mufflers for impending mods. I have some "old" Flowmaster 40 Series mufflers that I had on my53 F100 for about 500 miles. I cut the old pipe out of them and prepped them for the impending hybrid inlet/outlet mod. Plan is to run 3" pipes to the mufflers and then 2.5" out. The flow loss will not be a huge difference in power (mufflers are the big restriction for noise), and I'll have the cutouts ahead of the mufflers for when I need to "go to 11".

REar brake line routing and a few frame pics..

Got the driveshaft in today. I had it shortened slightly by Dynotech/Balance Engineering. Think of them as a company that specializes in balancing equipment, with a side business building custom driveshafts. I had to change the slip yoke out from the SSR yoke to the shorter B-car yoke, so I burned out the OEM nylon retainers and popped in an OEM u-joint I had on the shelf. Slapped it in, and shot a coat of Krylon clear to keep it looking purdy.. FWIW, it was about $100 cheaper to get a used SSR shaft off ebay, and have it modified than to have a custom aluminum shaft made.
2012-04-24_22-48-30_807.jpg


Here's a few pics of the new brake hoses installed. I need to add some retention near the spring.
2012-04-24_22-52-29_755.jpg


Shot of the install to the rear crossmember.
2012-04-24_22-54-34_406.jpg


And a shot of the modified LCA's and frame mods.
2012-04-24_22-55-04_620.jpg
 
Back
Top