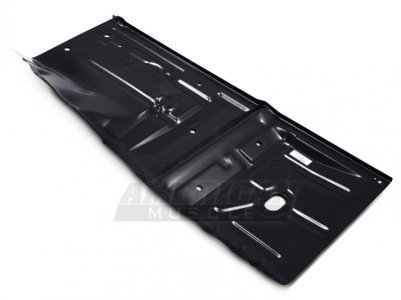
Full length floor pan questions?

cobrarwanab

Club Member
I am installing full length floor pans in my stang and have a few questions before i jump into the job.

When installing the pans, should i completely seal weld the pan or use stitch weld every 3 or so inches. Also should i use a flange punch and spot weld the pans in? I have learned to take my time with thin material and to move around often to help dissipate heat. Do i weld the under body side or just the topside and use seam sealer top and bottom?

Second, what seam sealer have you guys used. What worked and what didn't. Looking for something an a caulk gun type application. Any info
 
80% is prep!

...20% is welding.....it's really depend on "how" ya set the entire
floor up.....

Like Sean said....either way will work fine....pick one.

How bad is it?

I've been throughin' sparks for a long time....and....uuhhhhh....what
exactly do YOU mean by "seal weld the pan"???

Of course....I would stitch the panels....and then go back & finish 'em
up....but...thats just me.....

How good is the remaining metal?

Post some pic's if ya can....IF not....good luck.

Hope it turns out.....jus take yur time.....keep a body hammer handy....

Keep the welds flat while there are cooling...save yourself some time
later.....will be eaiser to seal everything up later.

-
 
are you going from the hem seam or did you trim back from the hem seam and add new metal ?
I am new to autobody panels so i am not to savvy on the lingo yet. but i imagine the hem seam is the aria where the new panel meets the old metal? If this is the case than i am going to have to add a strip of new metal at the front and the very rear of the panel( Aria circled in orange). the seam aria that was originally filled with factory seam sealer is all rusted out and i plan on forming 2 strips to take their place. the front and rear of the new pan will be welded to this new metal. Now i know i am going to flange punch the sill side of the pan as it has a lip just as the stock pan. I will recreate the "spot weld" with addition of welding the top of the flange to the sill. Now as for the aria in the picture with the green line, should i cut that aria along the contour of the pan exactly and but weld new metal to old or should i leave at lease a 1in overlap of steel to weld on?
...20% is welding.....it's really depend on "how" ya set the entire
floor up.....

Like Sean said....either way will work fine....pick one.

How bad is it?

I've been through in' sparks for a long time....and....uuhhhhh....what
exactly do YOU mean by "seal weld the pan"???

Of course....I would stitch the panels....and then go back & finish 'em
up....but...thats just me.....

How good is the remaining metal?

Post some pic's if ya can....IF not....good luck.

Hope it turns out.....jus take your time.....keep a body hammer handy....

Keep the welds flat while there are cooling...save yourself some time
later.....will be easier to seal everything up later.

-

And for "seal weld" thats just how i refer to a complete weld bead all the way around the peace. I'm not sure if i could run 2 1/2in stitch welds every 3 inches or so then fill the remaining seam with seam sealer.


the last pic is the pans i have
 

Attachments

  • pans1.jpg
    pans1.jpg
    79.3 KB · Views: 42
  • floor pan.jpg
    floor pan.jpg
    29.1 KB · Views: 40
Last edited:
flange punch tool....

You have one right?


It looks like your floor pan has a large enough flange already....is there enough overlap left on the car?

Now I see what ya mean ....

hear are a few links to some site a had saved for reference to help me out....check 'em out....maybe they might help....

They all show different procedures for basically the same thing...new pans!

http://www.ford-trucks.com/forums/893426-floor-pan-replacement.html

http://www.mustangmonthly.com/howto/mump_0411_pan_replace/index.html

http://www.thaimazda3.com/svmanual/esicont/en/srvc/html/B3E098053750B02.html

http://eolson1111.tripod.com/mustang2/id6.html

http://www.hotrodscustomstuff.com/CR-11-05.html

http://www.tachrev.com/JeffLilly/floor_replace3.pdf

http://www.twintorino.com/floor.html

http://1bad6t.com/floorpan.html

If it were me...I'd punch a few holes alond the flange for spot welds to start the pan and get it it "place"
and the stitch the whole damn thing.....


I got some pic's somewhere....I'll see if I can find them....

I'll be back.

-
 
Last edited:
"WHAT" are gonna use for a welder?

I am replacing both sides (driver and passenger) and i am using my miller multimatic MIG at work. I usually weld together frames for industrial air dryers. Steel is on average 1/8-1/4 thick. But I have been practicing with thin plate and have been able to achieve flat stitch welds. Time consuming to control heat but effective. I have not yet removed the old floors as i am removing the 100 or so spot welds that hold the pan. And thank you for the links +1!
 
the hem seam is where the rocker backing panel meets the floor pans.

Ahh, Then yes i am going from the hem seam. The new panel has the factory style lip on it and my rocker back plate is clean. I figured i would purchase a flange punch tool to replicate the factory spot welds along the length of the rocker.
 
when i did my first floor pan i spot welded most of it since my welder would just burn through...and i didnt use a mask since i would just close my eyes....oh man you should have seen me the next day, i was purple. Wear a mask!
 
Ahh, Then yes i am going from the hem seam. The new panel has the factory style lip on it and my rocker back plate is clean. I figured i would purchase a flange punch tool to replicate the factory spot welds along the length of the rocker.


Do one section at a time. Not the whole floor at once. without a chassis plate the car will pop out of square.
 
when i did my first floor pan i spot welded most of it since my welder would just burn through...and i didnt use a mask since i would just close my eyes....oh man you should have seen me the next day, i was purple. Wear a mask!

Do one section at a time. Not the whole floor at once. without a chassis plate the car will pop out of square.

Thanks for all the input. And as for the purple face, Before i got my self-darkening mask I had many un wanted sun burns from tacking. All good advice!
 
ALL good advise!

Purple!......thats funny......kinda....I hear ya man....that shit stings....

seriously.....keep jumpin' around.....let that stuff cool....sheet metal ain't
NOTHIN' like what your are used to weldin'....:banghead:....heats up FAST!

I forgot to mention about the spot welder cutter that cobrarwanab
mentioned....

Between that, a flange/punch combo tool, and a body saw, these can
make life MUCH eaiser when gettin' started on sheetetal repair/replacement!

Although I do not use this setting much....my ol' Snap On YA219B MIG has
a "stitch" setting on it .....

I can set the time "on" for each weld as well as the "rest" time in between
each weld.....kinda kool....ONCE ya get the hang of it......


Keep us posted man....good luck....
-
 
Back
Top